

Amazon Bedrock Agent와 서버리스 아키텍처로 서비스 만들기
들어가며
이번 글에서는 PDF 리포트를 근거로 답변하는 RAG 기반 AI 분석 API를 완전 서버리스로 구축한 과정을 정리합니다. 사용자 입력을 받아 Bedrock Agent가 Knowledge Base를 검색하고, 구조화된 JSON 분석 결과를 반환하는 파이프라인입니다.
처음 설계할 때 세운 원칙은 단순했습니다.
- 서버를 한 대도 직접 운영하지 않는다.
- AI의 답변은 반드시 실제 리포트 데이터에 근거해야 한다 — LLM이 그럴듯하게 지어내는 수치는 신뢰할 수 없습니다.
- 인프라 전체를 코드로 관리한다.
이 글에서는 이 세 가지 원칙을 어떤 AWS 서비스로 풀어냈는지, 실제 구현 코드와 함께 정리합니다.
왜 Bedrock Agent였나
핵심 기능은 “사용자 입력 → 실제 리포트 데이터 검색 → 구조화된 분석 결과 생성”입니다. 처음에는 Lambda에서 직접 InvokeModel로 LLM을 호출하고 RAG 검색 로직을 직접 짜는 방안도 검토했지만, 결국 Amazon Bedrock Agent + Knowledge Base 조합을 선택했습니다.
| 요구사항 | 직접 구현 시 | Bedrock Agent 사용 시 |
|---|---|---|
| RAG 검색 | 임베딩 → 벡터 검색 → 프롬프트 조립 코드를 직접 작성 | Knowledge Base 연결만 하면 Agent가 알아서 검색 |
| 검색 쿼리 생성 | 사용자 입력을 검색 쿼리로 변환하는 로직 필요 | Agent가 입력을 해석해 스스로 검색 쿼리 생성 |
| 프롬프트 관리 | Lambda 코드에 프롬프트가 섞임 | Agent Instruction으로 인프라 레벨에서 버전 관리 |
| 인프라 운영 | 벡터 DB 클러스터 관리 | OpenSearch Serverless로 완전 관리형 |
즉, Lambda는 “Agent를 호출하고 결과를 저장하는 역할”만 남기고, 검색·추론·응답 생성은 전부 Bedrock에 위임하는 구조입니다.
전체 아키텍처
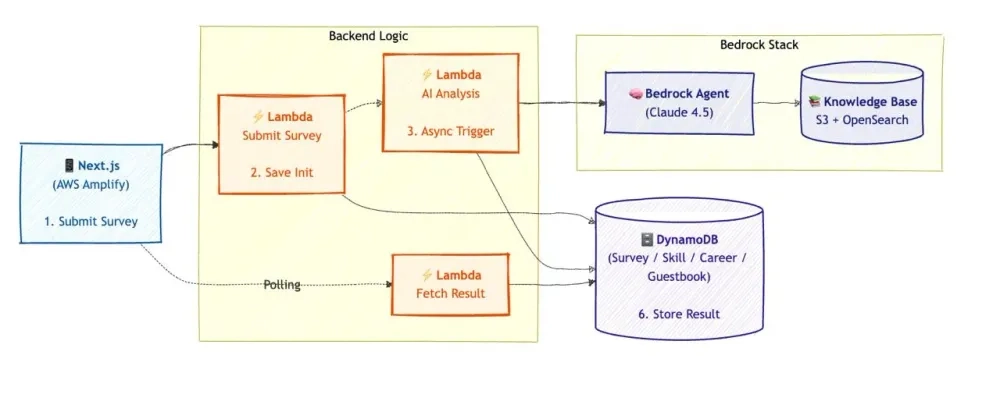
1. Amazon Bedrock Agent — 분석의 두뇌
Agent의 행동은 전부 Instruction(시스템 프롬프트) 으로 제어합니다. CDK 코드 안에 Instruction을 함께 정의했기 때문에, 프롬프트 변경도 코드 리뷰와 배포 파이프라인을 그대로 탑니다.
// infra/lib/bedrock-stack.ts
// inference profile을 사용해야 on-demand 호출이 가능
const foundationModelId = "us.anthropic.claude-sonnet-4-5-20250929-v1:0";

const agent = new cdk.CfnResource(this, "BedrockAgent", {
  type: "AWS::Bedrock::Agent",
  properties: {
    AgentName: "career-analysis-agent",
    AgentResourceRoleArn: agentRole.roleArn,
    FoundationModel: foundationModelId,
    Instruction: agentInstruction,   // 분석 미션 + 출력 JSON 스키마 정의
    IdleSessionTTLInSeconds: 600,
    AutoPrepare: true,
    KnowledgeBases: [{
      KnowledgeBaseId: knowledgeBase.getAtt("KnowledgeBaseId"),
      Description: "Future of Jobs Report 2025 data",
      KnowledgeBaseState: "ENABLED",
    }],
  },
});
Instruction 설계에서 배운 것 두 가지를 공유합니다.
첫째, Knowledge Base 검색 횟수를 명시적으로 제한해야 합니다. 초기에는 Agent가 스킬 하나당 검색을 한 번씩 수행해서 응답에 2분 넘게 걸렸습니다. Instruction에 아래 규칙을 넣자 응답 시간이 크게 줄었습니다.
You MUST limit your Knowledge Base searches to a maximum of 2 queries total.
Combine multiple topics into a single broad query rather than making
separate searches for each topic.
After completing your searches, proceed directly to generating the final
response. Do NOT search again.
둘째, 출력 스키마를 Instruction에 박아두면 후처리가 단순해집니다. Agent가 마크다운 없이 순수 JSON만 반환하도록 강제하고, Lambda에서는 파싱만 담당합니다.
2. 조사 파이프라인 — Investigator → Triage → Graph → Reporter
Your entire response must be a raw JSON object starting with { and ending with }.
Do not wrap the output in markdown code fences.

{
  "remaining_years": "<integer, minimum 1>",
  "remaining_years_reason": "<1-2 sentence summary>",
  "skill_risks": [ { "skill_name": ..., "replacement_prob": ..., ... } ],
  "career_cards": [ { "combo_formula": ..., "roadmap": [...] } ]
}
2. Bedrock Knowledge Base + OpenSearch Serverless — 환각 없는 RAG
“AI가 지어낸 수치”를 막는 핵심이 Knowledge Base입니다. PDF를 S3에 올리고, Knowledge Base가 이를 청킹·임베딩(Titan Embed Text v2)해서 OpenSearch Serverless 벡터 인덱스에 적재합니다.
여기서 신경 쓴 포인트가 두 가지 있습니다.
계층적 청킹(Hierarchical Chunking)
통계 리포트는 “차트 하나가 하나의 의미 단위”입니다. 검색은 작은 청크(300 토큰)로 정밀하게 하되, LLM에는 부모 청크(1,500 토큰)를 통째로 전달해 문맥이 잘리지 않게 했습니다.
// infra/lib/bedrock-stack.ts — KB Data Source 설정
VectorIngestionConfiguration: {
  ChunkingConfiguration: {
    ChunkingStrategy: "HIERARCHICAL",
    HierarchicalChunkingConfiguration: {
      LevelConfigurations: [
        { MaxTokens: 1500 },  // 부모 청크 - 큰 문맥 보존
        { MaxTokens: 300 },   // 자식 청크 - 검색 단위
      ],
      OverlapTokens: 60,
    },
  },
  ...
}
Foundation Model 파싱
PDF 속 차트·그래프는 일반 텍스트 추출로는 수치가 유실됩니다. ParsingStrategy: BEDROCK_FOUNDATION_MODEL을 사용해 LLM이 차트를 표로 변환하며 인제스트하도록 하고, 파싱 프롬프트로 “순위와 퍼센트 수치를 절대 생략하지 말 것”을 지시했습니다.
ParsingConfiguration: {
  ParsingStrategy: "BEDROCK_FOUNDATION_MODEL",
  BedrockFoundationModelConfiguration: {
    ModelArn: `arn:aws:bedrock:${region}:${accountId}:inference-profile/...`,
    ParsingPrompt: {
      ParsingPromptText: [
        "1. When converting charts to tables, always include the exact",
        "   percentage value for every item. Do not truncate rankings.",
        "2. Preserve both Industry vs Global values in separate columns.",
        "3. Preserve all figure identifiers (e.g. 'FIGURE 2.2') as",
        "   markdown headings so they are searchable.",
      ].join("\n"),
    },
  },
}
벡터 인덱스는 Custom Resource로
OpenSearch Serverless 컬렉션은 CloudFormation이 만들어주지만, 벡터 인덱스 자체는 CloudFormation 리소스가 없습니다. 그래서 CDK Custom Resource + Lambda로 인덱스를 생성했습니다. SigV4 서명(AWS4Auth)으로 인증하는 부분이 핵심입니다.
# infra/lib/oss-index-creator/index.py
from opensearchpy import OpenSearch, RequestsHttpConnection
from requests_aws4auth import AWS4Auth

def create_index(event):
    credentials = boto3.Session().get_credentials()
    awsauth = AWS4Auth(
        credentials.access_key, credentials.secret_key,
        region, "aoss", session_token=credentials.token,
    )
    client = OpenSearch(
        hosts=[{"host": host, "port": 443}],
        http_auth=awsauth, use_ssl=True,
        connection_class=RequestsHttpConnection,
    )

    index_body = {
        "settings": {"index.knn": True},
        "mappings": {
            "properties": {
                "bedrock-knowledge-base-default-vector": {
                    "type": "knn_vector",
                    "dimension": 1024,   # Titan Embed Text v2 차원
                    "method": {"engine": "faiss", "name": "hnsw"},
                },
                "AMAZON_BEDROCK_TEXT_CHUNK": {"type": "text"},
                "AMAZON_BEDROCK_METADATA": {"type": "text"},
            }
        },
    }
    client.indices.create(index=index_name, body=index_body)
3. AWS Lambda + API Gateway — 비동기 분석 파이프라인
AI 분석은 30초~1분 이상 걸립니다. API Gateway의 29초 타임아웃 안에 동기 응답으로 처리할 수 없어서, “접수 → 비동기 분석 → 폴링 조회” 패턴으로 분리했습니다.
- POST /survey — 설문을 DynamoDB에 status: analyzing으로 저장하고, 분석 Lambda를 비동기(Event) 호출한 뒤 즉시 200 응답
- GET /result/{sid} — 프론트엔드가 주기적으로 폴링, status: completed가 되면 결과 렌더링
# lambda/functions/survey/handler.py — 접수 후 비동기 위임
table.put_item(Item={
    "session_id": survey.session_id,
    "job_title": survey.job_title,
    "strengths": survey.strengths,
    "status": "analyzing",
    "created_at": datetime.now(timezone.utc).isoformat(),
})

lambda_client.invoke(
    FunctionName=ANALYZE_FUNCTION_NAME,
    InvocationType="Event",   # 비동기 호출 — 응답을 기다리지 않음
    Payload=json.dumps({...}),
)
return response(200, {"session_id": survey.session_id, "status": "analyzing"})
분석 Lambda는 bedrock-agent-runtime의 invoke_agent API로 Agent를 호출합니다. 응답이 스트리밍 청크로 오기 때문에 이어붙이는 처리가 필요하고, Agent 추론이 길어질 수 있어 boto3 read_timeout을 기본값보다 넉넉하게 잡아야 합니다.
# lambda/functions/analyze/handler.py
bedrock_agent_runtime = boto3.client(
    "bedrock-agent-runtime",
    config=Config(read_timeout=120, connect_timeout=10,
                  retries={"max_attempts": 2}),
)

def _invoke_bedrock_agent(prompt: str) -> str:
    response = bedrock_agent_runtime.invoke_agent(
        agentId=BEDROCK_AGENT_ID,
        agentAliasId=BEDROCK_AGENT_ALIAS_ID,
        sessionId=str(uuid.uuid4()),
        inputText=prompt,
    )
    # 스트리밍 응답 수집
    completion = ""
    for event in response.get("completion", []):
        chunk = event.get("chunk", {})
        if "bytes" in chunk:
            completion += chunk["bytes"].decode("utf-8")
    return completion
API Gateway에는 이벤트성 서비스 특성을 고려해 스로틀링을 걸어 두었습니다.
// infra/lib/api-stack.ts
this.api = new apigateway.RestApi(this, "CareerApi", {
  defaultCorsPreflightOptions: {
    allowOrigins: apigateway.Cors.ALL_ORIGINS,
    allowMethods: apigateway.Cors.ALL_METHODS,
  },
  deployOptions: {
    stageName: "prod",
    throttlingRateLimit: 50,
    throttlingBurstLimit: 100,
  },
});
공통 유틸리티(Pydantic 모델, 검증 로직, 로깅)는 Lambda Layer 하나로 묶어 6개 함수가 공유합니다. Windows 개발 환경에서도 Linux 호환 패키지가 빌드되도록 Docker 번들링을 사용했습니다.
const commonLayer = new lambda.LayerVersion(this, "CommonLayer", {
  code: lambda.Code.fromAsset("../lambda", {
    bundling: {
      image: cdk.DockerImage.fromRegistry("public.ecr.aws/sam/build-python3.14:..."),
      command: ["bash", "-c",
        "pip install -r layers/common/requirements.txt -t /asset-output/python " +
        "--platform manylinux2014_x86_64 --only-binary=:all: && " +
        "cp -r layers/common/python/models /asset-output/python/ ..."],
    },
  }),
  compatibleRuntimes: [lambda.Runtime.PYTHON_3_14],
});
4. Amazon DynamoDB — 스키마 없는 결과 저장소
분석 결과는 세션 단위로 조회되고, 접근 패턴이 단순(파티션 키 조회)해서 DynamoDB가 딱 맞았습니다. PAY_PER_REQUEST 모드라 트래픽이 없으면 비용도 없습니다.
활용한 DynamoDB 기능들:
- BatchWriter — 스킬 분석 결과 여러 건을 배치로 저장
- UpdateExpression의 ADD 연산
- GSI — 최신순 조회용(created_at-index), 세션당 중복 등록 방지용(session_id-index)
# 분석 결과 배치 저장 — float는 Decimal로 변환 필요
table = dynamodb.Table(SKILL_GRAPH_TABLE_NAME)
with table.batch_writer() as batch:
    for risk in skill_risks:
        batch.put_item(Item=_convert_to_decimal({
            "session_id": session_id,
            "skill_name": risk["skill_name"],
            "replacement_prob": risk["replacement_prob"],
            "time_horizon": risk["time_horizon"],
            "justification": risk["justification"],
        }))
IAM 권한은 CDK의 grant 메서드로 함수별 최소 권한만 부여했습니다.
props.surveyTable.grantReadWriteData(analyzeHandler);  // 분석 함수는 읽기/쓰기
props.surveyTable.grantReadData(resultHandler);        // 조회 함수는 읽기만
analyzeHandler.grantInvoke(surveyHandler);             // survey → analyze 호출 허용
5. Amazon S3 — Knowledge Base 데이터 파이프라인
리포트 PDF는 S3 버킷에 두고 Knowledge Base의 Data Source로 연결했습니다. 재미있는 점은 PDF 배포까지 CDK에 포함시킨 것입니다. BucketDeployment를 쓰면 cdk deploy 시점에 로컬 pdfdata/ 디렉터리가 자동으로 S3에 업로드되므로, “버킷은 만들어졌는데 데이터가 없는” 상태가 원천적으로 생기지 않습니다.
// infra/lib/storage-stack.ts
this.kbBucket = new s3.Bucket(this, "KnowledgeBaseBucket", {
  blockPublicAccess: s3.BlockPublicAccess.BLOCK_ALL,
  encryption: s3.BucketEncryption.S3_MANAGED,
});

new s3deploy.BucketDeployment(this, "DeployPdfData", {
  sources: [s3deploy.Source.asset("../pdfdata")],
  destinationBucket: this.kbBucket,
  destinationKeyPrefix: "pdfdata",
});
6. AWS Amplify Hosting — 프론트엔드 CI/CD
Next.js 프론트엔드는 정적 export(out/) 후 Amplify Hosting으로 서빙합니다. GitHub 저장소를 연결해 두면 main 브랜치 push마다 자동으로 빌드·배포됩니다. GitHub 액세스 토큰은 Secrets Manager에서 가져와 코드에 노출되지 않게 했고, API Gateway URL은 CDK 스택 간 참조로 환경변수에 자동 주입됩니다.
// infra/lib/frontend-stack.ts
const githubToken = secretsmanager.Secret.fromSecretNameV2(
  this, "GitHubToken", "dooms/github-token");

const amplifyApp = new amplify.CfnApp(this, "Frontend", {
  repository: "<https://github.com/.../>...",
  accessToken: githubToken.secretValue.unsafeUnwrap(),
  environmentVariables: [
    { name: "NEXT_PUBLIC_API_URL", value: props.apiUrl },  // ApiStack 출력을 주입
    { name: "AMPLIFY_MONOREPO_APP_ROOT", value: "frontend" },
  ],
  buildSpec: buildSpecYaml,
});

new amplify.CfnBranch(this, "MainBranch", {
  appId: amplifyApp.attrAppId,
  branchName: "main",
  enableAutoBuild: true,   // push하면 자동 배포
  stage: "PRODUCTION",
});
7. AWS CDK + CloudWatch — 재현 가능한 인프라와 관측
전체 인프라는 CDK(TypeScript) 스택 4개로 정의되어 있고, 스택 간 의존성도 코드로 명시됩니다. DynamoDB 테이블 객체나 Agent ID가 props로 다음 스택에 전달되므로, 리소스 이름을 하드코딩할 일이 없습니다.
// infra/bin/app.ts — 스택 간 의존성 주입
const storageStack = new StorageStack(app, "StorageStack", { env });

const bedrockStack = new BedrockStack(app, "BedrockStack", {
  env, kbBucket: storageStack.kbBucket,
});

const apiStack = new ApiStack(app, "ApiStack", {
  env,
  surveyTable: storageStack.surveyTable,
  bedrockAgentId: bedrockStack.agentId,
  bedrockAgentAliasId: bedrockStack.agentAliasId,
});

new FrontendStack(app, "FrontendStack", { env, apiUrl: apiStack.api.url });
관측은 CloudWatch Logs로 해결했습니다. 모든 Lambda에 보존 기간 1주일짜리 LogGroup을 명시적으로 붙이고, 분석 파이프라인의 각 단계에 [TIMING] 구조화 로그를 심어 병목을 추적했습니다.
logger.info("[TIMING] Bedrock Agent 호출 완료: session_id=%s, duration=%.3fs",
            session_id, agent_duration)
logger.info("[TIMING] 비율 - Agent: %.1f%%, Parsing: %.1f%%, DB저장: %.1f%%", ...)
이 로그 덕분에 “전체 응답 시간의 95% 이상이 Agent 추론 구간”이라는 사실을 확인했고, 최적화 방향을 인프라가 아닌 Agent Instruction(검색 횟수 제한) 으로 잡을 수 있었습니다.
마무리 — 만들어보고 느낀 것
- 관리형 RAG의 생산성은 압도적입니다. Knowledge Base 덕분에 임베딩 파이프라인, 벡터 검색, 청크 관리 코드를 한 줄도 짜지 않았습니다. 대신 계층적 청킹과 FM 파싱 같은 인제스트 품질 설정에 시간을 쓰는 것이 결과 품질에 훨씬 큰 영향을 줬습니다.
- Agent의 성능 튜닝은 코드가 아니라 Instruction에서 나옵니다. 검색 횟수 제한 한 줄이 어떤 인프라 최적화보다 응답 시간을 크게 줄였습니다. [TIMING] 로그로 병목을 수치화한 뒤 Instruction을 고치는 사이클이 유효했습니다.
- CloudFormation이 지원하지 않는 틈은 Custom Resource로 메울 수 있습니다. OpenSearch Serverless 벡터 인덱스처럼 IaC 공백이 있는 리소스도 Lambda 기반 Custom Resource로 감싸면, 여전히 cdk deploy 한 번으로 전체 스택이 재현됩니다.
서버 한 대 없이 Amplify, API Gateway, Lambda, DynamoDB, S3, Bedrock, OpenSearch Serverless만으로 AI 분석 서비스가 완성됐고, 트래픽이 없을 때 비용은 사실상 0에 수렴합니다. 이벤트성 AI 서비스를 빠르게 만들어야 한다면 이 조합을 추천합니다.
참고 자료
- Amazon Bedrock Agents 개발자 가이드
- Amazon Bedrock Knowledge Bases — Chunking 전략
- Amazon OpenSearch Serverless 벡터 검색
글 | 메가존클라우드 Commercial Managed Unit 최영훈 매니저
![[AI 프로젝트 성공 전략 2부] : AI 시대 기업이 선택해야 하는 것은 모델이 아니라 AI 운영 체계다](https://img.iting.co.kr/wp-content/uploads/2026/08/image4.png)

![[고객사례] 경농 | 생성형 AI로 스마트 영농일지 ‘파밍노트’의 혁신을 끌어올리다](https://img.iting.co.kr/wp-content/uploads/2026/08/%EA%B2%BD%EB%86%8D-mzc-logo-scaled.png)
